Repainted Hasbro Vintage Collection Jabba and Throne
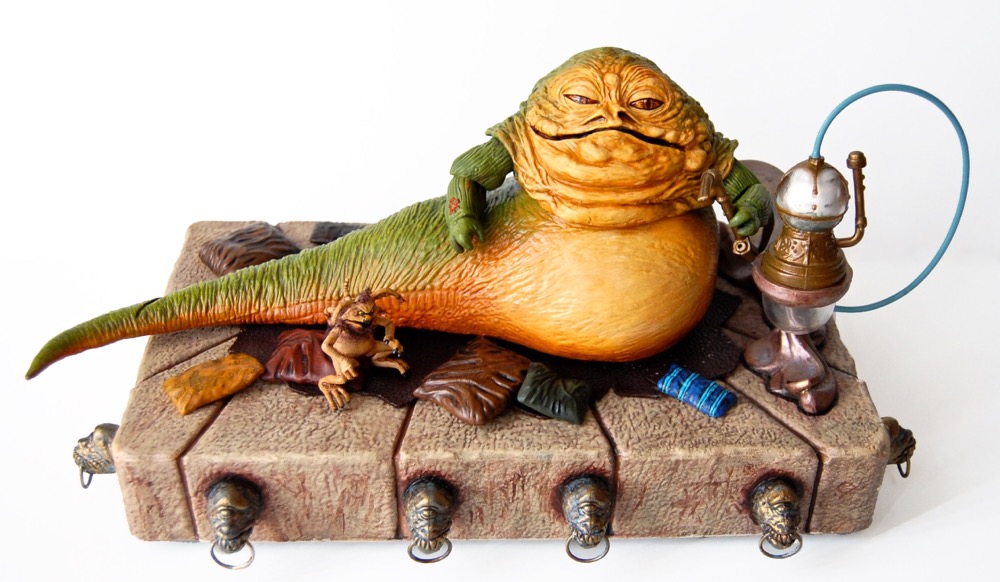
This is my repainted and modified version of the 2010 Hasbro Vintage Collection Jabba and Throne. I completely repainted Jabba, the throne, Salacious Crumb, and the pillows. For Jabba, I stuffed his body with some synthetic batting (the stuff you might put in a stuffed animal) to give him more height and to make his body more firm. As I said in this earlier post, you can just strip off his lower body to reveal the inner workings. It may not be immediately obvious when you look at the VC Jabba, but his head and torso really sit too low on his body.
I do have one word of warning if you are thinking of repainting Jabba. I normally prime my figures with white spray paint before I repaint them so I have a clean canvas to work on, and so the paint will stick better. When I tried this on Jabba, I found that his lower body never got dry — the paint stayed tacky no matter how long I waited. I eventually had to use some lacquer thinner to remove the spray paint on his lower body and start over. I think it’s just because of the material that the lower body is made of, since his upper body was fine.

For Salacious Crumb, I used bits of the same kind of batting I stuffed Jabba with to create some “real” hair, in addition to repainting him.

The throne is a combination of the original vintage throne and the Vintage Collection throne. The railing and base from the new throne were fine, but the gargoyle heads were ridiculously undersized. So I used the vintage heads instead, with the metal rings from the new throne. I had to carve out their mouths, insert the rings, and then resculpt their teeth using epoxy putty before repainting them. I used the vintage pipe and bowl since they are made of a clearer plastic than the new one. I used the hose from the new Jabba, but the mouthpiece from the vintage Jabba. I also made a piece of “animal skin” for Jabba to lay on using some pleather.

Overall, I’m very pleased with how it turned out. The new Jabba is a great base to use for customs, but even in its stock form it’s pretty nice. My main complaint is with the gargoyle heads, which just look all wrong. I’m actually planning on using them to make a throne for my Galactic Heroes Jabba, so you can tell how undersized they are.


Salacious Crumb is a psycho. 🙂
Jabba’s looking good though.
You are amazingly talented.
What do you do about joints and stuff? Do you leave the figure assembled and just try to coax paint between the hinge parts, or do you try to dismantle what you can? Do you use some kind of finish when you’re done to seal it? How durable is the new paint job? Would it hold up to some handling, or best left untouched?
That fur on Crumb is just outstanding. It really evokes an impression of the original puppet.
I can’t wait to see what you come up with for a Galactic Heroes throne. I might try to emulate what you do for mine.
With regard to joints, I basically just move the limb as far as it can go in one direction and paint it, then move it as far in the other direction as it will go and paint it. That seems to work okay, although I don’t really “play” with my figures, so I’m not really sure how durable the paint jobs actually are. The most I’ll usually do is move them from place to place or slightly change their pose. I actually think they’d hold up to a fair amount of handling, but not as much as the factory paint jobs, certainly.
Since I don’t handle them much, I don’t worry too much about using a sealer. Back when I painted Warhammer miniatures, I would seal them with a clear spray, but I had some bad experiences with the spray turning cloudy or slightly changing the look of the paint job, so I just decided to not do it anymore. These are really just display pieces, after all.
Hi! It’s been a while since you posted this but I just found your blog today and I see you still work on it, so I hope this message will reach you. Your repaint on Jabba is awesome, is no secret for collectors that Hasbro has made some of the finest sculpts but some of them are ruined by sloppy paint jobs. I don’t think it was the case for this particular Jabba but it certainly didn’t made justice to the figure either.
I’ve been collecting SW for almost twenty years, and that sloppiness from Hasbro quality control eventually made me go on the endless adventure of re painting and upgrading my figures. Las month I finally got my first Jabba! I was so happy and excited! it was on a fly market, and for a reasonable price. It is the Jabba from 2004 Saga Collection, although it pales in comparison with the modern one I think it looks pretty well, it certainly pass the test of time to me and I have a special place on my heart for figures like that, those which were released when I was younger and have no money to get them, so now that I have some extra income I spend some time hunting them.
But there’s also a disturbance on the force about those figures, although I like them exactly how they are sometimes I think a bit of paint here and there can make them shine even more. If you remember this particular Jabba it has a wonderful paint job on his eyes and a bit of an orange wash on his yellow parts. Since I got him I’ve been wondering if he can look better with some gently dark washes on the crevices of his body. Then I found your’s and I feel inspired and a bit more decided. So What I wanted to do (besides sharing my exciting for my Jabba) is asking for a sort of recipe, cause I still have a hard time trying to distinguish where it is a result of a wash or dry brushing just by looking at pictures.
I’ve had fun surfing your site, I also gave you a like on facebook to follow you. Never met such a BIG fan of Jabba before. Thanks for your time!
It’s difficult to give a recipe for this kind of thing, but in my case I mostly start by painting whatever the dark base color will be (dark green or dark orange, for example) and then manually paint on a few layers of lighter colors to make the highlights. This can be difficult if you don’t have experience painting, but you generally want to make the raised parts a bit lighter in color. You can also do this with drybrushing, although I find that gives you less control and a messier look in some cases.